Tutorial: Hello World
This tutorial explains how to build a full dApp using the zkSync development toolbox.
The following functionality will be implemented:
- There will be a greeting stored on a smart contract on zkSync.
- The user will be able to get the greeting after the dApp page is loaded.
- The user will be able to change the greeting on the smart contract.
- The user will be able to select the token that they want to pay the fee with.
Prerequisites
For this tutorial, the following programs must be installed:
yarnpackage manager.npmexamples will be added soon.Dockerfor compilation.- A wallet with some Görli
ETHon L1 (GörliUSDCis also required for the ERC-20 tutorial) to pay for bridging funds to zkSync as well as deploying smart contracts.
Initializing the project & deploying smart contract
- Initialize the project and install the dependencies. Run the following commands in the terminal:
mkdir greeter-example
cd greeter-example
yarn init -y
yarn add -D typescript ts-node ethers zksync-web3 hardhat @matterlabs/hardhat-zksync-solc @matterlabs/hardhat-zksync-deploy
Please note that currently typescript is required by zkSync plugins.
- Create the
hardhat.config.tsfile and paste the following code there:
require("@matterlabs/hardhat-zksync-deploy");require("@matterlabs/hardhat-zksync-solc");module.exports = { zksolc: { version: "0.1.0", compilerSource: "docker", settings: { optimizer: { enabled: true, }, experimental: { dockerImage: "matterlabs/zksolc", }, }, }, zkSyncDeploy: { zkSyncNetwork: "https://zksync2-testnet.zksync.dev", ethNetwork: "goerli", // Can also be the RPC URL of the network (e.g. `https://goerli.infura.io/v3/<API_KEY>`) }, networks: { hardhat: { zksync: true, }, }, solidity: { version: "0.8.10", },};- Create the
contractsanddeployfolders. The former is the place where all the contracts'*.solfiles should be stored, and the latter is the place where all the scripts related to deploying the contract will be put. - Create the
contracts/Greeter.solcontract and insert the following code there:
//SPDX-License-Identifier: Unlicensepragma solidity ^0.8.0;contract Greeter { string private greeting; constructor(string memory _greeting) { greeting = _greeting; } function greet() public view returns (string memory) { return greeting; } function setGreeting(string memory _greeting) public { greeting = _greeting; }}- Compile the contracts with the following command:
yarn hardhat compile- Create the deployment script in the
deploy/deploy.ts:
import { utils, Wallet } from "zksync-web3";import * as ethers from "ethers";import { HardhatRuntimeEnvironment } from "hardhat/types";import { Deployer } from "@matterlabs/hardhat-zksync-deploy";// An example of a deploy script that will deploy and call a simple contract.export default async function (hre: HardhatRuntimeEnvironment) { console.log(`Running deploy script for the Greeter contract`); // Initialize the wallet. const wallet = new Wallet("<WALLET-PRIVATE-KEY>"); // Create deployer object and load the artifact of the contract we want to deploy. const deployer = new Deployer(hre, wallet); const artifact = await deployer.loadArtifact("Greeter"); // Deposit some funds to L2 in order to be able to perform L2 transactions. const depositAmount = ethers.utils.parseEther("0.001"); const depositHandle = await deployer.zkWallet.deposit({ to: deployer.zkWallet.address, token: utils.ETH_ADDRESS, amount: depositAmount, }); // Wait until the deposit is processed on zkSync await depositHandle.wait(); // Deploy this contract. The returned object will be of a `Contract` type, similarly to ones in `ethers`. // `greeting` is an argument for contract constructor. const greeting = "Hi there!"; const greeterContract = await deployer.deploy(artifact, [greeting]); // Show the contract info. const contractAddress = greeterContract.address; console.log(`${artifact.contractName} was deployed to ${contractAddress}`);}- After replacing the
WALLET-PRIVATE-KEYtext with the0x-prefixed private key of the Ethereum wallet, run the script using the following command:
yarn hardhat deploy-zksyncIn the output, you should see the address where the contract was deployed to.
Paying for deployment in ERC20 tokens
This section is optional, and is used to learn how to pay for the deployment of the smart contracts in ERC20. To go straight to the front-end integration, click here.
- For example, to pay fees in the
USDCtoken:
const USDC_ADDRESS = "0xd35cceead182dcee0f148ebac9447da2c4d449c4";const USDC_DECIMALS = 6;const deploymentFee = await deployer.estimateDeployFee(artifact, [greeting], USDC_ADDRESS);// Deposit funds to L2.const depositHandle = await deployer.zkWallet.deposit({ to: deployer.zkWallet.address, token: USDC_ADDRESS, // We deposit more than the minimal required amount to have funds // for further iteraction with our smart contract. amount: deploymentFee.mul(2), // Unlike ETH, ERC20 tokens require approval in order to deposit to zkSync. // You can either set the approval in a separate transaction or provide `approveERC20` flag equal to `true` // and the SDK will initiate approval transaction under the hood. approveERC20: true,});// Wait until the deposit is processed by zkSync.await depositHandle.wait();- The output of the fee can then be produced in a human-readable format:
const parsedFee = ethers.utils.formatUnits(deploymentFee.toString(), USDC_DECIMALS);console.log(`The deployment will cost ${parsedFee} USDC`);Please note that the fees on the testnet do not correctly represent the fees on the future mainnet release.
USDCmust then be passed as thefeeTokento the deployment transaction:
const greeterContract = await deployer.deploy(artifact, [greeting], USDC_ADDRESS);- To pay fees in USDC for smart contract interaction, supply the fee token in the
customDataoverride:
const setNewGreetingHandle = await greeterContract.setGreeting(newGreeting, { customData: { feeToken: USDC_ADDRESS, },});Full example:
import { Wallet } from "zksync-web3";import * as ethers from "ethers";import { HardhatRuntimeEnvironment } from "hardhat/types";import { Deployer } from "@matterlabs/hardhat-zksync-deploy";const USDC_ADDRESS = "0xd35cceead182dcee0f148ebac9447da2c4d449c4";const USDC_DECIMALS = 6;// An example of a deploy script that will deploy and call a simple contract.export default async function (hre: HardhatRuntimeEnvironment) { console.log(`Running deploy script for the Greeter contract`); // Initialize the wallet. const wallet = new Wallet("<WALLET-PRIVATE-KEY>"); // Create deployer object and load the artifact of the contract we want to deploy. const deployer = new Deployer(hre, wallet); const artifact = await deployer.loadArtifact("Greeter"); const greeting = "Hi there!"; const deploymentFee = await deployer.estimateDeployFee(artifact, [greeting], USDC_ADDRESS); // Deposit funds to L2 const depositHandle = await deployer.zkWallet.deposit({ to: deployer.zkWallet.address, token: USDC_ADDRESS, amount: deploymentFee.mul(2), approveERC20: true, }); // Wait until the deposit is processed on zkSync await depositHandle.wait(); // Deploy this contract. The returned object will be of a `Contract` type, similarly to ones in `ethers`. // `greeting` is an argument for contract constructor. const parsedFee = ethers.utils.formatUnits(deploymentFee.toString(), USDC_DECIMALS); console.log(`The deployment will cost ${parsedFee} USDC`); const greeterContract = await deployer.deploy(artifact, [greeting], USDC_ADDRESS); // Show the contract info. const contractAddress = greeterContract.address; console.log(`${artifact.contractName} was deployed to ${contractAddress}`);}Front-end integration
Setting up the project
In this tutorial, Vue will be used as the web framework of choice, but the process will be quite similar regardless of the framework used. To focus on the specifics of using the zksync-web3 SDK, a template is supplied with all the front-end work done. The final step is to interact with zkSync smart contract.
- Clone it:
git clone https://github.com/matter-labs/greeter-tutorial-starter- Spin up the project:
cd greeter-tutorial-starter
yarn
yarn serve
By default, the page should be running at http://localhost:8080. Open this URL in the browser to see the page.
Connecting to Metamask & bridging tokens to zkSync
In order to interact with dApps built on zkSync, connect the Metamask wallet to the zkSync alpha testnet network and bridge some funds to L2.
Project structure
All the code will be written in the ./src/App.vue. All the front-end code has been completed; the only task left is to fill out the TODO-s regarding interaction with zkSync:
initializeProviderAndSigner() { // TODO: initialize provider and signer based on `window.ethereum`},async getGreeting() { // TODO: return the current greeting return "";},async getFee() { // TOOD: return formatted fee return "";},async getBalance() { // Return formatted balance return "";},async changeGreeting() { this.txStatus = 1; try { // TODO: Submit the transaction this.txStatus = 2; // TODO: Wait for transaction compilation this.txStatus = 3; // Update greeting this.greeting = await this.getGreeting(); this.retreivingFee = true; this.retreivingBalance = true; // Update balance and fee this.currentBalance = await this.getBalance(); this.currentFee = await this.getFee(); } catch (e) { alert(JSON.stringify(e)); } this.txStatus = 0; this.retreivingFee = false; this.retreivingBalance = false;},On the top of the <script> tag, you may see the parts that should be filled with the address of the deployed Greeter contract and the path to its ABI. Let's fill these fields in the following sections.
// eslint-disable-next-lineconst GREETER_CONTRACT_ADDRESS = ""; // TODO: insert the Greeter contract address here// eslint-disable-next-lineconst GREETER_CONTRACT_ABI = []; // TODO: insert the path to the Greeter contract ABI hereAdd imports above these constants. The header of the <script> tag will appear as the following:
import {} from "zksync-web3";import {} from "ethers";// eslint-disable-next-lineconst GREETER_CONTRACT_ADDRESS = ""; // TODO: insert the Greeter contract address here// eslint-disable-next-lineconst GREETER_CONTRACT_ABI = []; // TODO: insert the path to the Greeter contract ABI hereInstalling zksync-web3
Run the following commands to install zksync-web3 and ethers:
yarn add ethers zksync-web3Getting the ABI and contract address
Open ./src/App.vue and set the GREETER_CONTRACT_ADDRESS constant equal to the address where the greeter contract was deployed.
To interact with zkSync's smart contract, its ABI is also needed.
- Create the
./src/abi.jsonfile. - You can get the contract's ABI in the hardhat project folder from the previous section in the
./artifacts/contracts/tmp/Flattened.sol/Greeter.jsonfile. You should copy theabiarray and paste it into theabi.jsoncreated in the previous step. The file should look roughly the following way:
[ { "inputs": [ { "internalType": "string", "name": "_greeting", "type": "string" } ], "stateMutability": "nonpayable", "type": "constructor" }, { "inputs": [], "name": "greet", "outputs": [ { "internalType": "string", "name": "", "type": "string" } ], "stateMutability": "view", "type": "function" }, { "inputs": [ { "internalType": "string", "name": "_greeting", "type": "string" } ], "name": "setGreeting", "outputs": [], "stateMutability": "nonpayable", "type": "function" }]Set the GREETER_CONTRACT_ABI to require the ABI file.
// eslint-disable-next-lineconst GREETER_CONTRACT_ADDRESS = "0x...";// eslint-disable-next-lineconst GREETER_CONTRACT_ABI = require("./abi.json");Working with provider
- Go to the
initializeProviderAndSignermethod in./src/App.vue. This method is called after the connection to Metamask is successful.
In this method we should:
- Initialize
Web3ProviderandSignerobjects for interacting with zkSync. - Initialize
Contractobject to interact with theGreetercontract.
- Add the necessary dependencies:
import { Contract, Web3Provider, Provider } from "zksync-web3";- The two steps can be done the following way:
initializeProviderAndSigner() { this.provider = new Provider('https://zksync2-testnet.zksync.dev'); // Note that we still need to get the Metamask signer this.signer = (new Web3Provider(window.ethereum)).getSigner(); this.contract = new Contract( GREETER_CONTRACT_ADDRESS, GREETER_CONTRACT_ABI, this.signer );},Retrieving the greeting
- Fill in the method retrieving the greeting from smart contract:
async getGreeting() { // Smart contract calls work the same way as in `ethers` return await this.contract.greet();}The full methods now look the following way:
initializeProviderAndSigner() { this.provider = new Provider('https://zksync2-testnet.zksync.dev'); // Note that we still need to get the Metamask signer this.signer = (new Web3Provider(window.ethereum)).getSigner(); this.contract = new Contract( GREETER_CONTRACT_ADDRESS, GREETER_CONTRACT_ABI, this.signer );},async getGreeting() { return await this.contract.greet();},After connecting the Metamask wallet, the following page should be viewable:
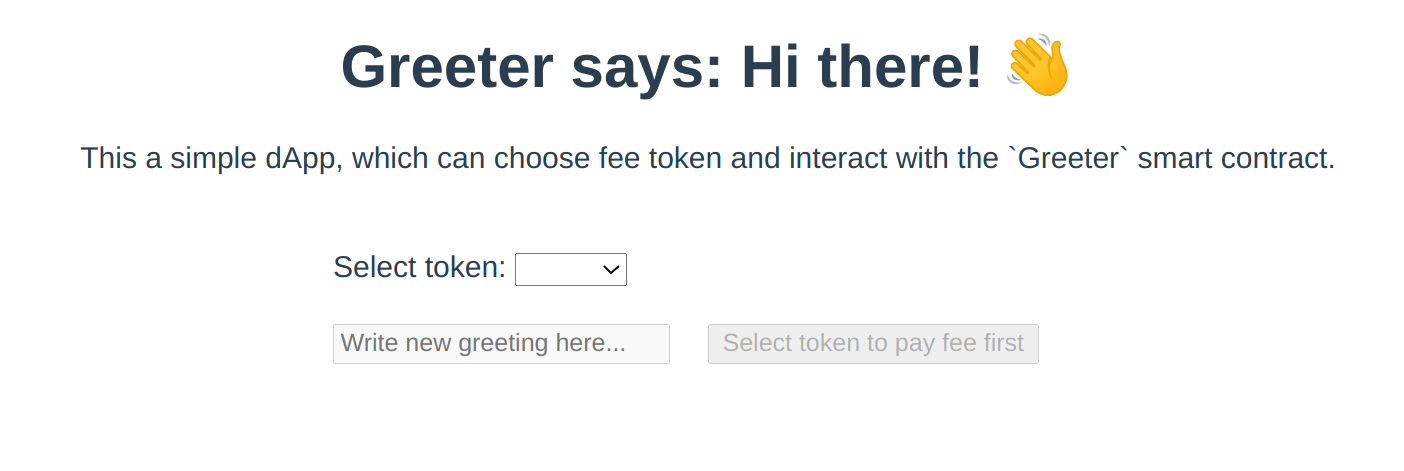
The chosen token to pay the fee can now be selected. However, no balances are updated, yet.
Retrieving token balance and transaction fee
The easiest way to retrieve the user's balance is to use the Signer.getBalance method.
- Add the necessary dependencies:
// `ethers` is only used in this tutorial for its utility functionsimport { ethers } from "ethers";- Implement the method itself:
async getBalance() { // Getting the balance for the signer in the selected token const balanceInUnits = await this.signer.getBalance(this.selectedToken.address); // To display the number of tokens in the human-readable format, we need to format them, // e.g. if balanceInUnits returns 500000000000000000 wei of ETH, we want to display 0.5 ETH the user return ethers.utils.formatUnits(balanceInUnits, this.selectedToken.decimals);},- stimate the fee:
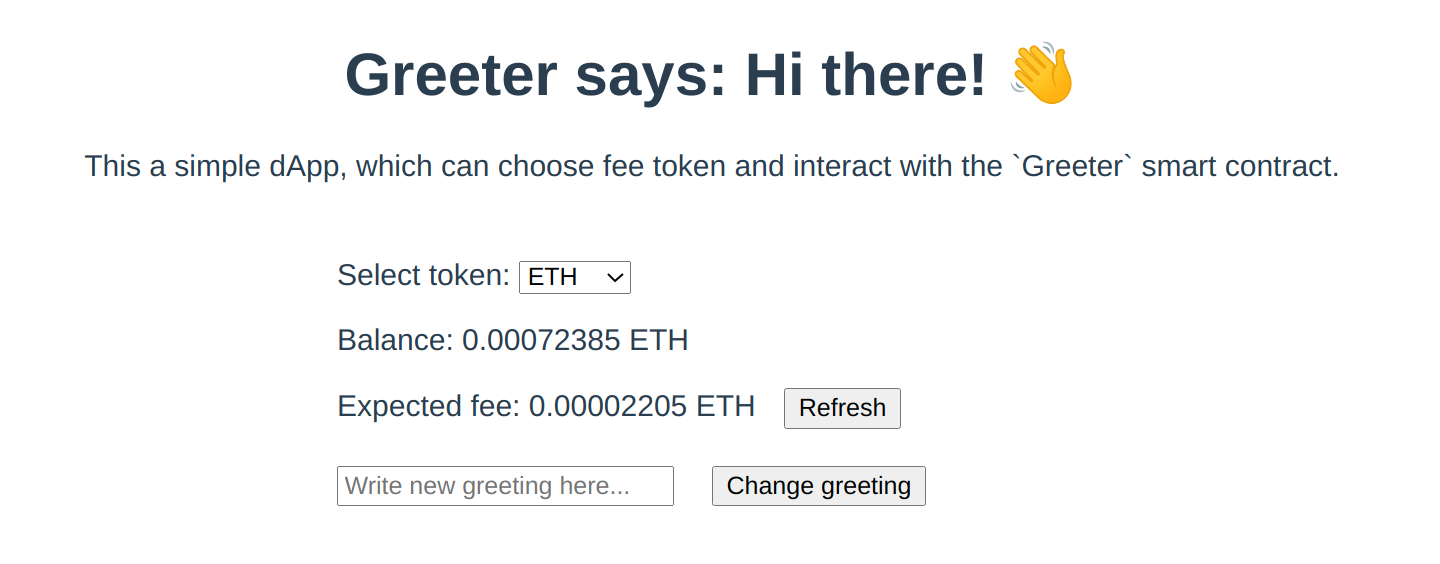
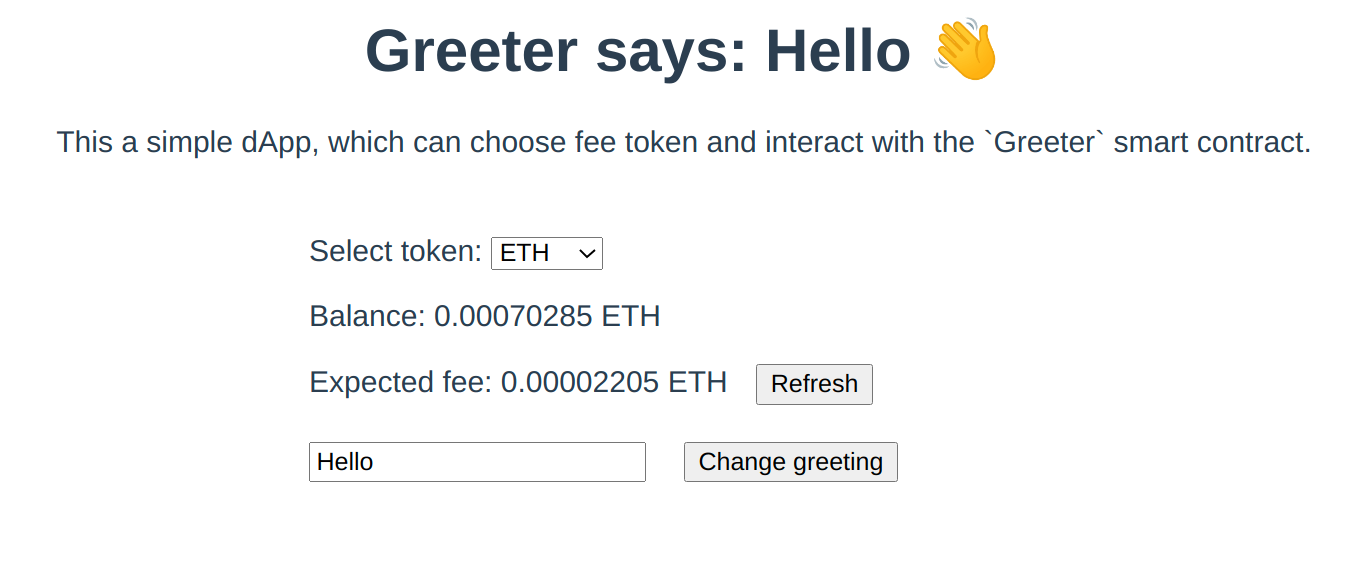
async getFee() { // Getting the amount of gas (ergs) needed for one transaction const feeInGas = await this.contract.estimateGas.setGreeting(this.newGreeting); // Getting the gas price per one erg. For now, it is the same for all tokens. const gasPriceInUnits = await this.provider.getGasPrice(); // To display the number of tokens in the human-readable format, we need to format them, // e.g. if feeInGas*gasPriceInUnits returns 500000000000000000 wei of ETH, we want to display 0.5 ETH the user return ethers.utils.formatUnits(feeInGas.mul(gasPriceInUnits), this.selectedToken.decimals);},When opening the page and select the token to pay fee with, the balance and the expected fee for the transaction will be available.
The Refresh button should be used to recalculate the fee, as the fee may depend on the length of the string to be set.
It is possible to also click on the Change greeting button, but nothing will be changed as the contract has not been called yet.
Updating the greeting
- Interacting with smart contract works absolutely the same way as in
ethers, however, thecustomDataoverride is required to supply thefeeTokenof the transaction:
const txHandle = await this.contract.setGreeting(this.newGreeting, { customData: { // Passing the token to pay fee with feeToken: this.selectedToken.address, },});- Wait until the transaction is committed:
await txHandle.wait();The full method looks the following way:
async changeGreeting() { this.txStatus = 1; try { const txHandle = await this.contract.setGreeting(this.newGreeting, { customData: { // Passing the token to pay fee with feeToken: this.selectedToken.address } }); this.txStatus = 2; // Wait until the transaction is committed await txHandle.wait(); this.txStatus = 3; // Update greeting this.greeting = await this.getGreeting(); this.retreivingFee = true; this.retreivingBalance = true; // Update balance and fee this.currentBalance = await this.getBalance(); this.currentFee = await this.getFee(); } catch (e) { alert(JSON.stringify(e)); } this.txStatus = 0; this.retreivingFee = false; this.retreivingBalance = false;},Complete app
The greeting should now be updatable.
- Type the new greeting in the input box and click on the
Change greetingbutton:
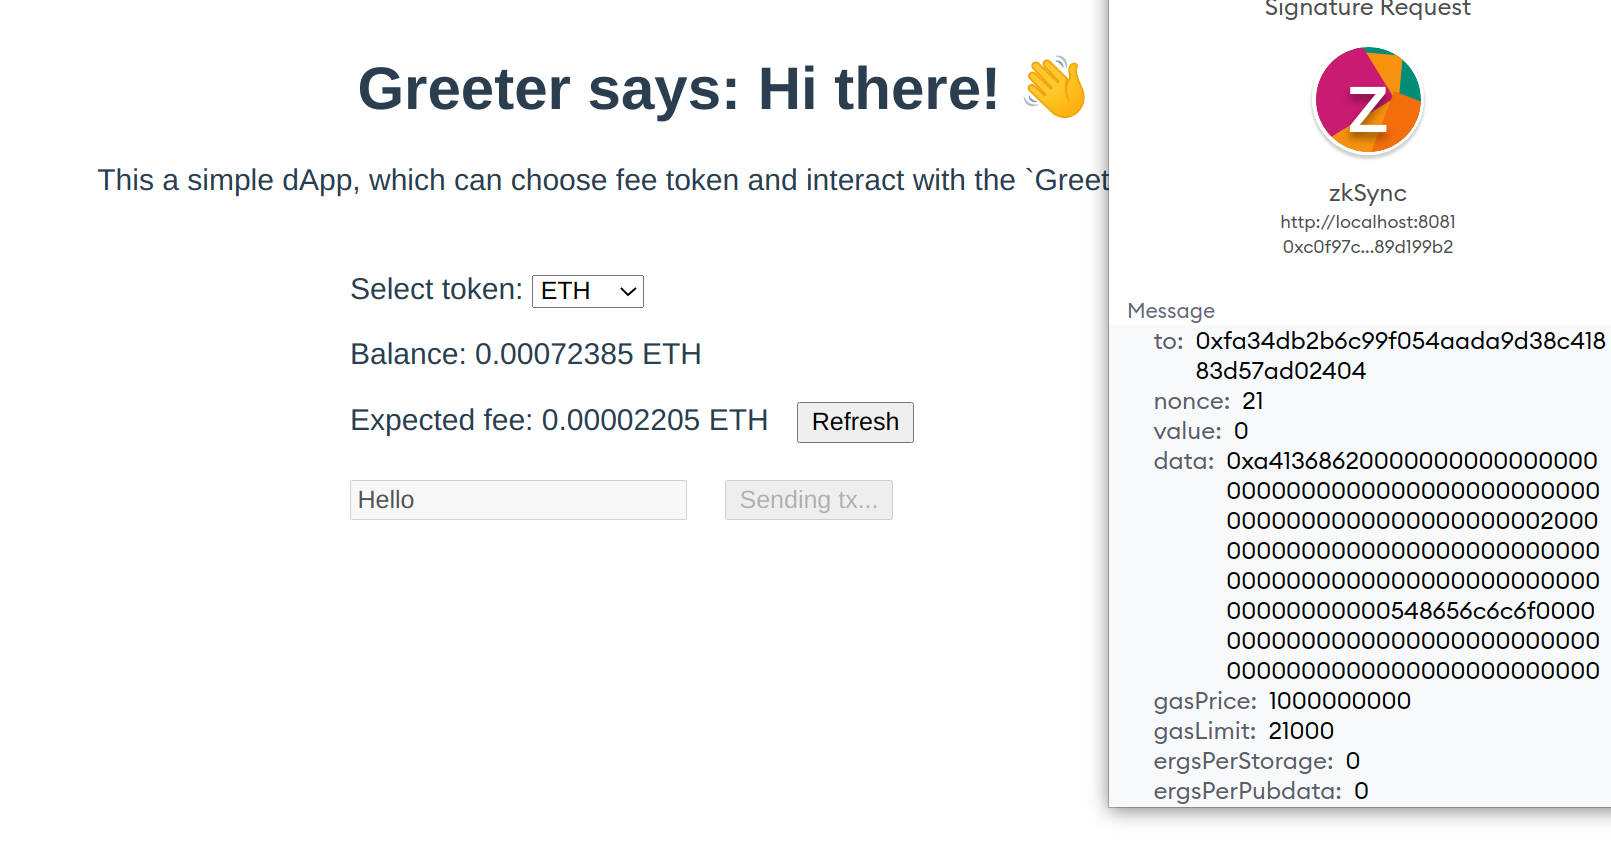
- Since the
feeTokenwas supplied, the transaction to be sent is of theEIP712type:
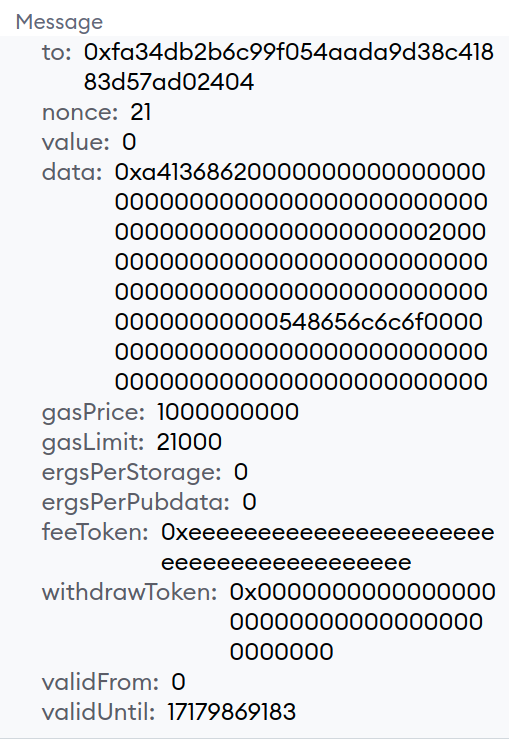
- Click "Sign".
After the transaction is processed, the page updates the balances and the new greeting can be viewed:
Learn more
- To learn more about
zksync-web3SDK, check out its documentation. - To learn more about the zkSync hardhat plugins, check out their documentation.